Mobile Logo Detection in the Wild
The making of the Brille
This article is about one of the projects I did in my day job, working together with my colleague Dr. Carolin Kaiser on computer vision, data science projects for market research. The ambitious goal was: detecting brand logos from an ego perspective using “smart glasses.” In the process, I developed “die Brille” (German for “the glasses”) out of necessity. It was quite a journey with many lessons learned, parts of which I wanted to share.
Back Story
This journey starts in late 2016. My employer, a not-for-profit research institute, then focused on market research. Part of the data science team’s job was to develop new methods and sources for gaining insights about consumers. Ways that market research companies or brand companies could use to understand better what consumers like and do. In market research, it is common to pay large groups of people (panels), e.g., for being tracked online or for scanning and uploading their receipts.
One idea to measure people’s exposure to brand logos and see what brands they use in their everyday lives is using smart glasses. Why would we want to do that? Traditional market research methods like surveys and phone interviews are becoming less and less popular among consumers. They are also error-prone as, for instance, we don’t have perfect memory. In other projects, we have shown that detecting logos in social media images is a cool and effective way to see consumer trends or measure the influence of marketing campaigns (here is an example) - but what about the world outside of social media?
Tackling that question is where the idea with the glasses came in. Using smart glasses would enable detecting every brand logo a person sees in a day. A whole panel of carefully chosen people would reveal insights about what brands people buy and use, how frequently they do so, what brands they see in print, online, TV, billboard advertisements, etc. We’d be able to capture from all visual sources at once. Building on that idea, with a classification of the context of a logo, e.g., “web page”, “billboard”, “real product” - really cool insights could potentially be derived that would be pretty hard to gain using conventional methods and technologies.
CNNdroid and Coincidence
In October 2016, the time was about to get ripe for starting to explore this idea. My colleague, Dr. Carolin Kaiser, had discovered a paper about CNNdroid, for GPU-Accelerated Execution of Trained Deep Convolutional Neural Networks on Android.
Deep convolutional neural networks (DCNNs) are used in computer vision, for instance, for image classification. A typical image classification task is to determine what an image represents, e.g., if it predominantly shows a car or an airplane or a person or a cat, etc. My colleague and I already had experience with DCNNs for computer vision from our work about brand logo and object detection in social media images.
Deep learning models (such as deep convolutional neural networks) are known to be data and compute-hungry: they usually require big servers with highly performant GPUs (graphic card chips) and consume lots of memory. This is especially true when training them (they need to “learn” first), but it also applies when merely using them after training.
For our battery-powered smart glasses project, server-grade compute performance was out of the question. For privacy reasons, uploading images to a server in the cloud was a no-go. The idea was to recognize brand logos on the mobile device and only upload a log of brand logo touchpoints.
Pairing smart glasses with a smartphone was a viable option - and CNNdroid made it even more feasible.
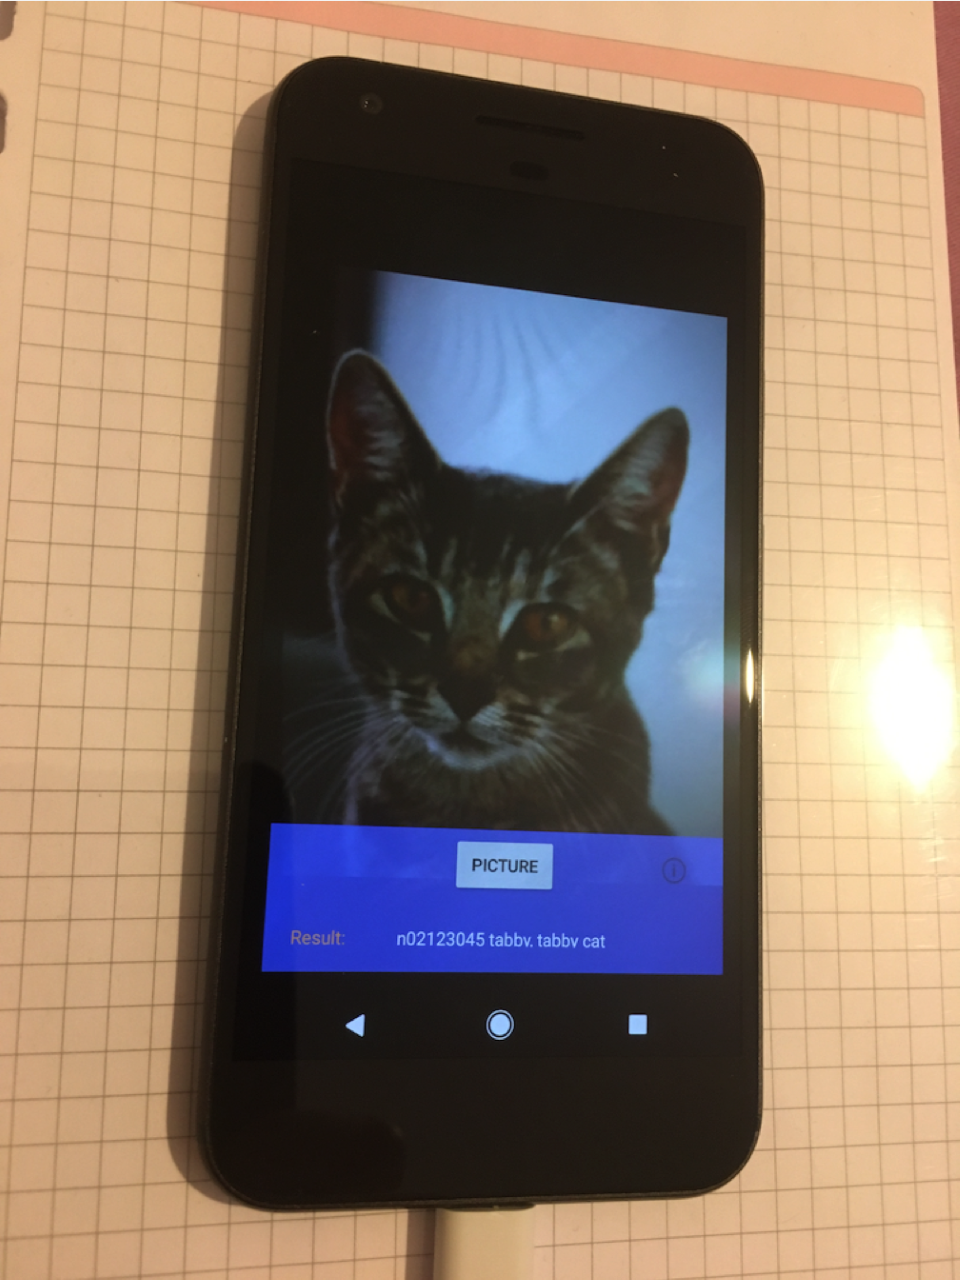
Being an iPhone user at the time, I was jealous that CNNdroid only ran on Android. Coincidentally, at the end of October 2016, Google’s Pixel phone came out, and I was on vacation, with a bit of spare time at my disposal. So I decided to plunge in: I got myself a Pixel phone, downloaded the Android SDK, cloned CNNdroid from GitHub, and started to hack away. It didn’t take long, and I could classify images captured by my phone camera using a freely available image classification model. I was excited. Once classification (“is this an image of a cat?”) works, maybe there is a way to get object detection (“where in the picture is a cat?”) working, too. There were so many things I wanted to try, as there are numerous approaches to tackle object detection.
Incidentally, I have never looked back to the iPhone world. I was astonished by how developer-friendly Android was (and how much saner its notifications are on the lock screen). But I digress.
Eventually, I got a brand logo classification model, trained on one of the proprietary datasets we had used in previous projects to work with CNNdroid. But I was still using the phone’s camera. Now we needed something like Google Glasses.
The Sony Glasses
Unfortunately, at that time, Google had discontinued selling Google Glasses to ordinary people, so we had to look for alternatives. And we found: Sony Smart Glasses! Well, my colleague found them. She always finds the right stuff at the right time! We decided the Sony’s were the best in terms of features offered for an acceptable price.
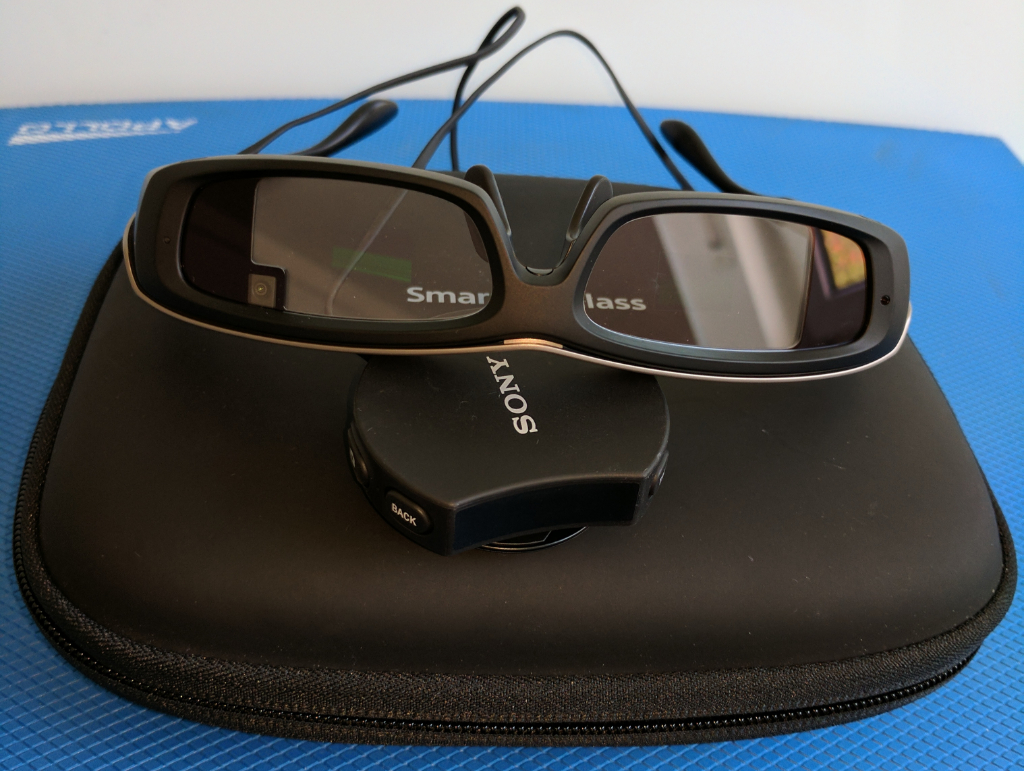
I immediately ordered Sony Smart Glasses and got myself immersed in its API and Android programming in general. It’s Java all the way down, which took a bit of getting used to.
There was a lot to learn and a lot to do. Still, gradually, I got it all to work in a prototype: The Smart Glasses were controlled by the smartphone, which consecutively took pictures via the glasses’ camera, then wirelessly transferred them to the phone, converted them, and ran them through the image classifier. After that, it displayed the image and result on the phone. Just for giggles, I also implemented text-to-speech output and had the phone speak out whenever it “recognized” a brand logo.
Bear in mind that this was still image classification. So to detect a logo, it had to be the dominant content of an image. Or, in other words, you had to get pretty close to the logo.
While it was an outstanding achievement and certainly looked very high-tech and futuristic, running around with smart glasses and having a phone call “Coca-Cola” when approaching a bottle of coke, the shortcomings of the Sony Glasses started to become, well, noticeable.
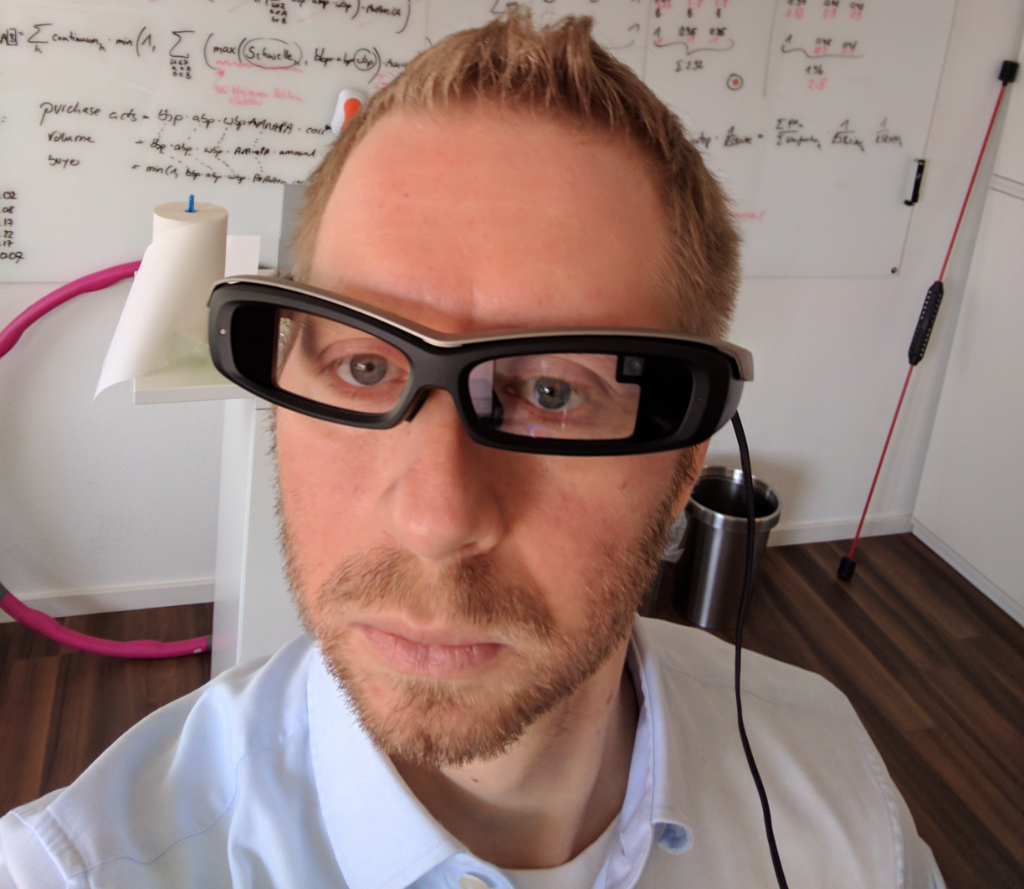
First of all, the Sony Glasses were rather clunky. They also made a non-suppressible shutter sound that everyone around you would hear when you snapped an image. Second, they operated with Bluetooth. Transferring an image via Bluetooth would take about two seconds minimum. Given the neural net would take about one second to process the picture, the Bluetooth delay became quite a performance bottleneck.
As a more complicated alternative, the image transfer could be done much faster via WiFi, running a WiFi access point on the mobile phone, draining the battery of the glasses much quicker. We only got about 1.5 hours of operating time in this mode. Bluetooth was used to control the WiFi transmission, and it was quite sensitive to electromagnetic interference. Other Bluetooth devices in proximity of the glasses would often cause the Bluetooth stack to crash, requiring a restart of both the Bluetooth and the WiFi stack in a defined order. Occasionally though, the WiFi stack would not come up again - and the glasses had to be powered off and back on.
This unreliability that could hit at any moment was something we needed to address. But before worrying too much about the odd Bluetooth interference, we needed to become able to detect logos: The glasses would be of little use if you had to get your nose close to a logo just have it recognized.
YOLO
In my search for a DCNN for object detection that’s small enough to run on a mobile phone, I discovered the awesome YOLO (V2) project that also featured a “tiny” implementation for mobile. See its paper for more details.
The fascinating part about YOLO is that it is a single shot detector. That means object detections can be derived directly from the output of the neural network. Requiring only a single pass through the neural network is an incredible performance gain compared to the classifier based methods we had used in our previous projects. The Selective Search algorithm proposes thousands of image regions that are then fed to a classifier for detection. Faster R-CNN uses region proposal networks to generate the region proposals. To run an image classifier ~2000 times, once for each proposed region of interest, is obviously much slower than a single pass through a DCNN.
Of course, tiny, mobile-friendly networks are not as accurate and precise as their big server counterparts. But Tiny YOLO looked too exciting and promising; we had to give it a try.
So I hacked together a pipeline that converted one of our brand logo datasets and fine-tuned the Tiny YOLO model with it. I admired the darknet deep learning framework its author put together. This clean implementation of a simple deep learning framework in pure C, using NVIDIA’s CUDA for running code on GPUs - just has to be admired.
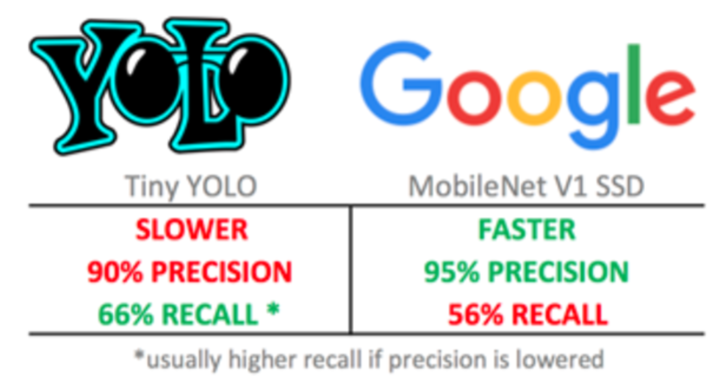
The initial results were excellent; it achieved:
- 90% precision (90% of detected logos were correct)
- 66% recall (it found 66% of the logos).
In combination with the Sony glasses, this was quite a good prototype; however, the logos in this initial dataset were mostly from consumer goods and not suitable for what we had in mind: logo encounters outdoors. More on that later.
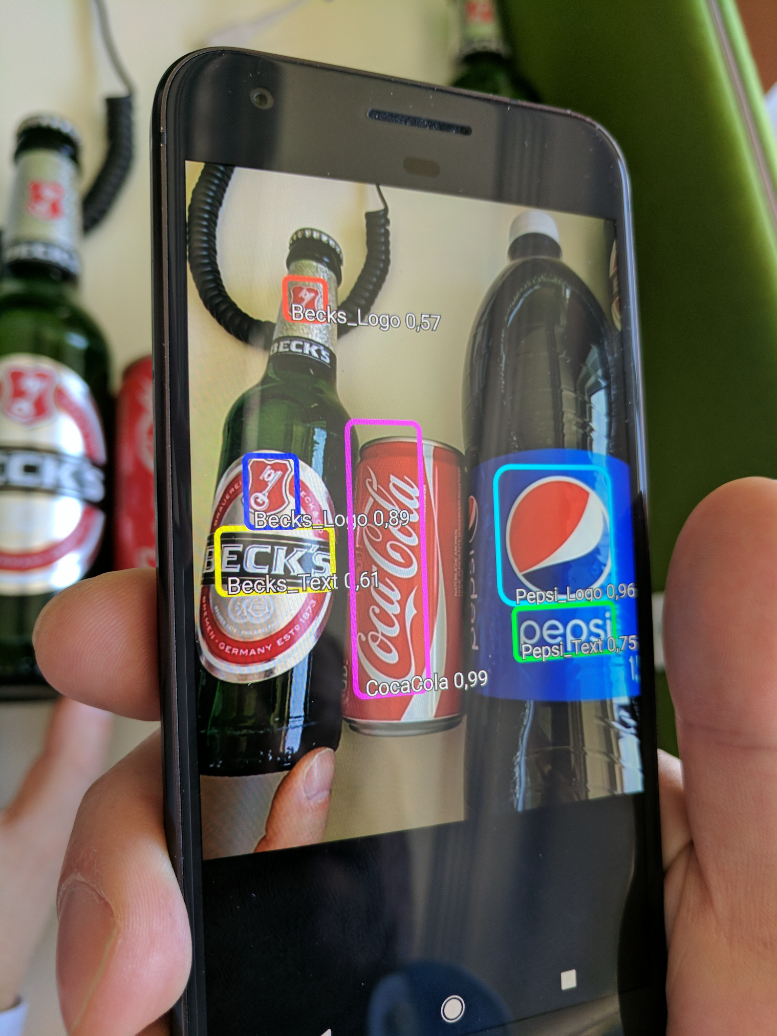
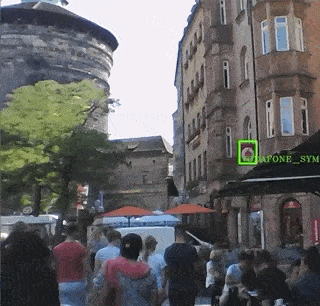
Here are some examples of the “YOLOdroid” app in action:

Google MobileNet
In June 2017, Google released and highly praised their MobileNets, computer vision models specifically designed to run tasks like object detection on mobile devices. MobileNets are Single Shot MultiBox Detector models, using a different kind of single shot detector. Releasing them was a very welcome step, as it largely democratized computer vision on mobile devices. Google offered pre-trained models in different “sizes” to balance the trade-off between model performance and runtime performance. Their APIs also contained everything for running the models on mobile devices.
Since training and incorporating a MobileNet into our mobile app would have meant a considerable amount of effort, I had not tried them immediately when I read about them. YOLO was performing well. However, I was intrigued - even more so after my visit to the CVPR 2017.
CVPR, paradise, and mixed messages
In July 2017, I was lucky to attend the CVPR conference, one of the biggest computer vision conferences in the world, in Honolulu, Hawaii. The conference was purely amazing and the most interesting, exciting, and inspiring one I have ever attended. The location was breathtakingly beautiful and idyllic, too. It felt like a week in paradise, for mind, body, and soul.
I was fortunate and super proud to meet Met Fei-Fei Li, a superstar in the computer vision, deep learning, and artificial intelligence worlds. That called for a picture 😀 (which I will put here as soon as I get permission from her).
Being very interested in Google’s MobileNets, I was excited when I heard that Google was about to show them in action at their stand. They demonstrated object detection of little toy cars, toy giraffes, etc. So when demo time arrived, I went to the Google stand.
When I saw the demonstration and the reactions of the crowd, I just couldn’t help myself. I had to show that I, too, worked on mobile object detection. So I went to a vending machine nearby, returned to the Google stand with a can of coke in my hand, approaching the Googlers with something along the lines of “This is the object detection demo stand… well, then let me demonstrate mobile object detection to you!”, raising my Coca Cola can, taking the Google Pixel phone out of my pocket, and launching our YOLOdroid app. I was quite confident, and the demo worked brilliantly. YOLOdroid spotted the logo and tracked it as I moved the can through the air. The Google people seemed to like it and played around with it for a while.
But the best part is that the little demo got me the chance to talk to one of the MobileNet paper authors, so I got to ask him: How do the MobileNets compare to a (tiny) YOLO model? The essence of his answer was, basically (paraphrased):
At the same speed, MobileNets are more accurate
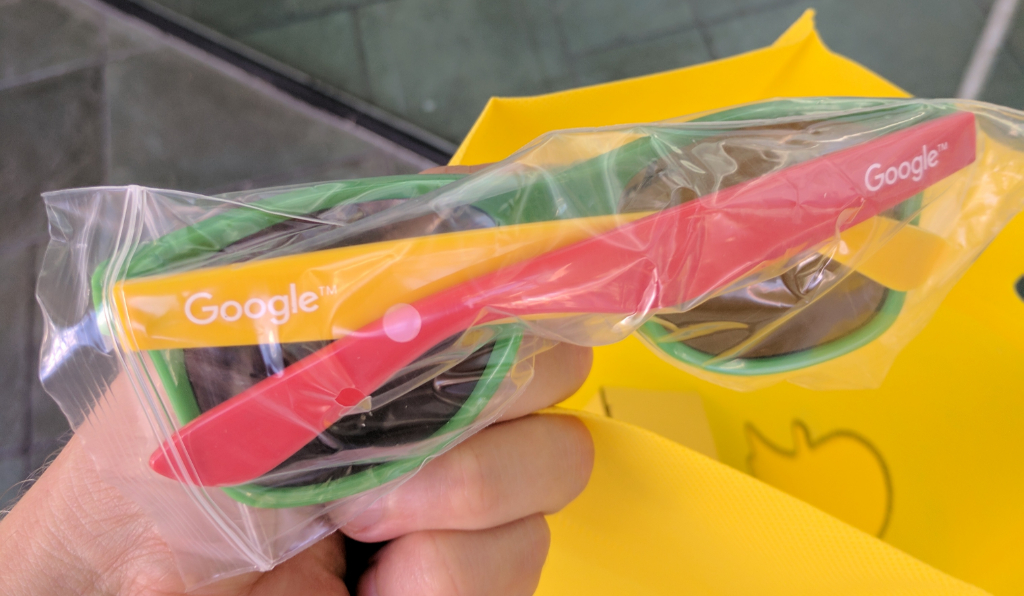
That sounded promising. It would mean that there was the possibility of getting an even better logo detection without sacrificing detection speed. I packed a pair of colorful Google sunglasses into my goodie bag and decided I would give MobileNets a try when I got back - and went on with the conference.
To my fortune, the author of YOLO was there, too! He presented his YOLO 9000 paper that later received the best paper award honorable mention. After his talk, I approached and asked him how YOLO compared to the Google MobileNets, to which he replied (paraphrased):
At the same accuracy, Tiny YOLO is faster
These two answers contradicted each other. If Mobilenets are more accurate but running at the same speed, how could Tiny YOLO be faster? I realized that there was no easy answer and that I would have to put both models to the test.
The plan
Fired up and all excited from the CVPR experience, I decided on two major things to do on my way back:
- to replace the Sony Glasses. Instead, I wanted to use a simple USB webcam if possible
- to try out Google’s MobileNets
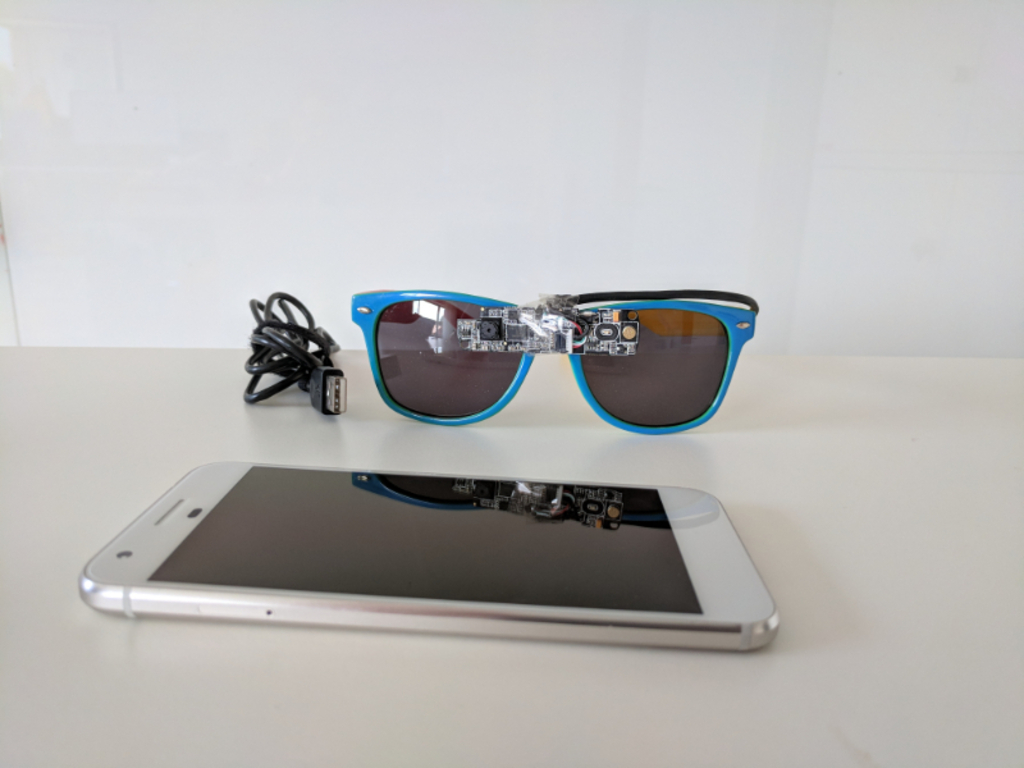
Making Computer Vision Glasses
Back at home, I more or less went straight into an electronics store and got myself two cheap Logitech USB webcams. I opened one up and removed the electronics board with the camera. Using a pair of scissors and some sticky tape, I simply attached the webcam to the Google sunglasses I had gotten at the Google stand.
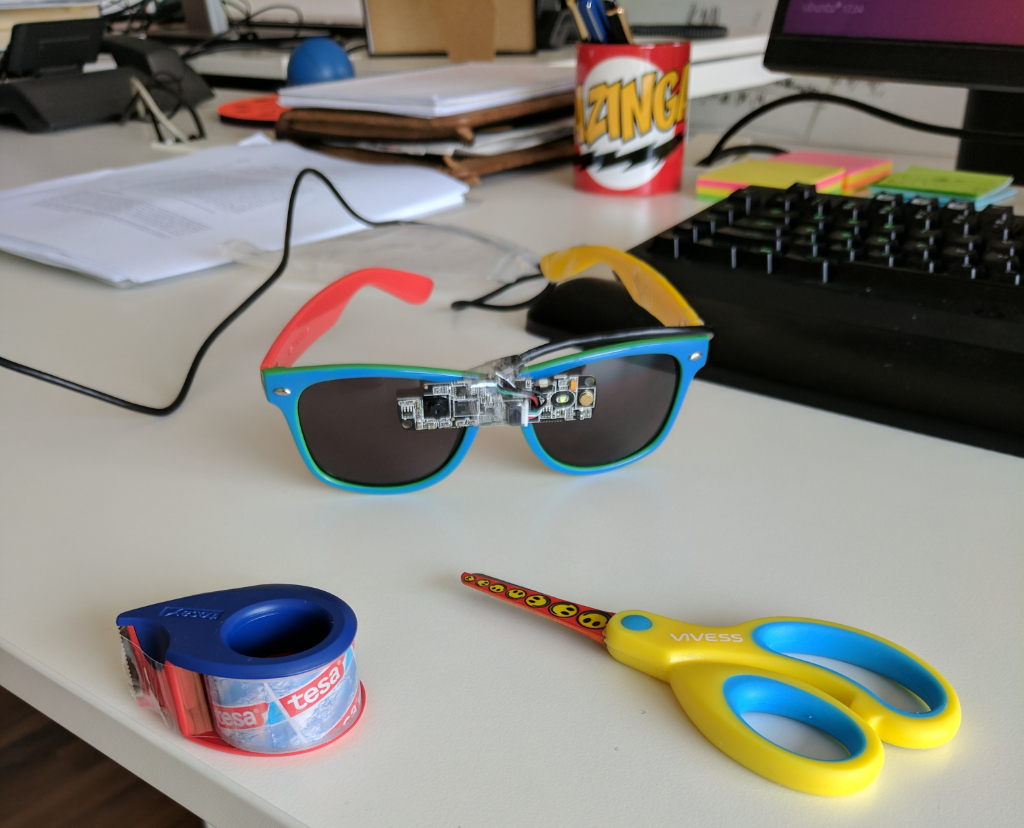
The Pixel phone came with a USB-A to USB-C adapter that I used to connect the webcam to the phone. Unfortunately, Android did not recognize the webcam as an additional camera. That would have been too easy anyway. So I had to implement the USB camera code with a bit of help from GitHub. And low and behold, it worked!
For less than EUR 30, I had created a replacement for Sony’s SmartGlasses ![]() (as far as our project was concerned)!
(as far as our project was concerned)!
Now we could snap images from the webcam, blazingly fast and super reliably. We were able to capture and process an image roughly every 0.8 seconds. Besides, the smartphone now directly powered the camera on the glasses. Since a camera uses much less power than a full-blown pair of smart glasses, the battery life increased to over 2.5 hours.
The shutter sound was gone, too, and the glasses looked far more stylish, in my opinion:

Also, notice the “eyebrow effect” of the USB cable ![]() .
.
We were pleased with our new setup, so it was time to check out the Google MobileNets.
Single Shot Detector Shootout
So once again, I converted our dataset and put together a training pipeline. I fine-tuned Google’s largest, best-performing MobileNet, implemented the Single Shot MultiBox Detector in the Android app, and tested the MobileNet in the office. My impression was that it didn’t recognize logos as well as the YOLO model, so I started to investigate.
How good is your data?
Performance metrics of deep learning models can be misleading. They depend on many factors, especially on the datasets used. If the test dataset is too similar to the training dataset, you might get top performance scores, but your model might have problems generalizing, which you’ll find out when testing your model with real-world data.
Using the same sources for training and test datasets, both suffer from the same biases. For instance, if you collect images of logos from printed magazines only, then split your data into training and test set, both datasets suffer from the “how logos look in magazines” bias. When you apply your logo detection to images snapped with your phone while walking outside on a rainy day in bad lighting conditions, you might find that your performance metrics don’t mean anything in this context. They accurately reflect only how well your model might perform on magazine images.
While it seems evident that a logo detection trained on magazine images might only work well on images of magazines, we often get carried away by the difficulty to acquire enough training data and forget about potential inherent biases of their sources.
The following comparison is effective, but it is not a fair one. Both models under test stem from base models trained on different datasets (Pascal VOC for Tiny YOLO vs. MSCOCO for MobileNets), and we might not have done a perfect job in fine-tuning either of them. However, we did our best to get reasonably good performance out of both models and select reasonable parameters when testing.
Do we have a winner?
We evaluated both models on the same dataset in our pursuit of answering the two long-standing, highly related questions:
- Which one performs better: Tiny YOLO or MobileNet?
- Which model should we use for our logo detection?
Aaand the answer is: it depends! Let’s look at some performance metrics:
To summarize:
The MobileNet:
- is slightly faster on our Pixel phone (up to ~100ms)
- is more precise: the logos it detects are of the correct brand more often
- finds fewer logos (lower recall)
whereas the Tiny YOLO model:
- is slighly slower on our Pixel phone
- is less precise: it makes more mistakes identifying the correct brand of a logo
- but overall, it finds more of our logos
It was a hard decision to make: do we want to find more logos, accepting more mistakes - or do we want fewer errors but missing more logos?
Given that both recall rates (66% vs. 56%) were far from perfect, we tended to opt for finding more logos, accepting a few more mistakes.
Another critical question was: How well do the models work for small logos? When trying to catch logos “in the wild”, walking outside, the logos in our photos would be relatively small, depending on the distance. Ideally, we’d want to recognize logos from as far away as possible. When humans can clearly identify a logo, our model should do so, too - under ideal circumstances.
To test that, we derived the following test setup:
- We put a labeled bottle of a particular beverage brand on our desk
- We slowly approached the bottle with our Pixel phone running the logo detection
- We kept the phone at a 90-degree angle from the desk surface (standing upright)
- We measured the distance at which the logo was first detected: the further away, the better!
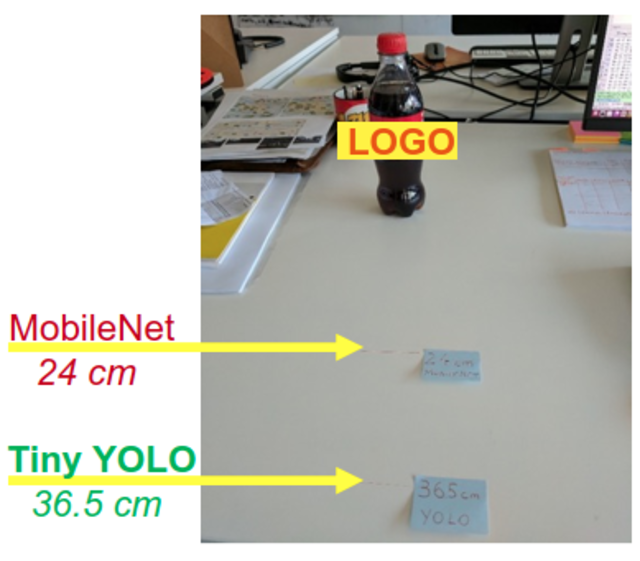
In this test, the Tiny YOLO clearly won, beating the MobileNet by 12.5 cm.
So it was settled. We decided to go further with Tiny YOLO.
The Case Study
Now that we had the technicalities all sorted out, it was time to do something useful with the logo detection glasses: We decided on doing a small case study to verify the approach of capturing consumers’ brand touchpoints via “smart glasses”. We also wanted to contrast the results from automatic logo detection with a more traditional market research method: a survey.
The first idea was to use the glasses while shopping, which we had to discard because taking pictures in shops is not permitted in Germany unless you have permission. We hadn’t, and it was unrealistic that we would get permission from every shop that we would have planned to visit.
So we changed the scenario: Probands of our case study would go on a fictional (window) shopping stroll in the city of Nuremberg, taking a pre-defined route while wearing our glasses and smartphones. We would make sure of knowing in advance all the brands’ logos on our route that were part of the case study. At one defined part of the shopping route, probands would get a choice to visit either a café or a fast-food chain, to take a small break and get rewarded for their participation with a coffee or beverage. Apart from that, they should behave as naturally as possible. We would not inform them what the case study was about.
After the shopping stroll, they would need to fill out a short survey asking sociodemographic questions and questions about brands and brand touchpoints. E.g., to name ten brands that they had seen on the trip, how they liked and used our selected brands, which touchpoints with the selected brands they could recall, the order of these touchpoints, etc.
During the guided walk, the logo detection would track, for every detected logo:
- timestamp
- geolocation
- logo
- logo size and location in the image
In combination with the timestamp, the logo size and location in the image can tell whether one had been moving towards or away from a logo.
Our next task was to identify suitable brands that were also detectable during a walk through the city and for which we already had some training images. We settled on five brands, two of which had both a graphical logo and a text part. We would identify text and logo individually for such brands, making it seven detectable classes in total.
A New Dataset
Our first training approach was to use a different proprietary dataset of 15 brands with 21 classes (some had logo and text to recognize) that we had used in the past. The results were discouraging: 86% precision but only 22% recall on average. Detecting only 22% of logos was not acceptable.
We had already known that the dataset was problematic. It contained lots of small logos, cut off logos, etc., that was difficult even for server-grade object detection models. So we threw away all the problematic images and collected new ones.
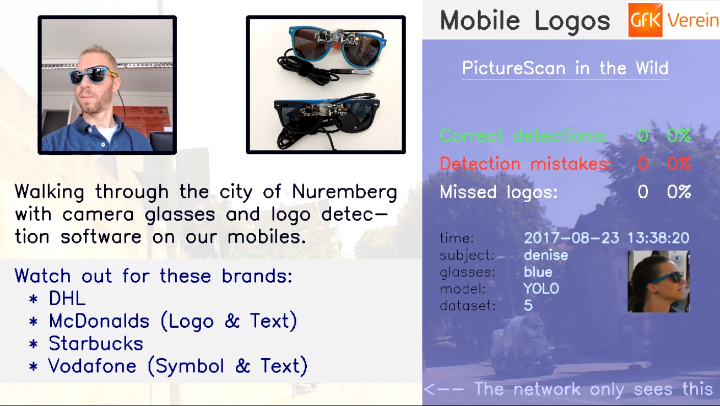
We used three sources: social media images, images returned by a web search, and images captured from our glasses!
I had prepared a second pair of webcam sunglasses and went on a field trip through Nuremberg with a working student, wearing our logo detection gear. We tried to capture the logos of our desired brands by looking at them along the way.
To my surprise, nobody even gave us a funny look. People were so busy that hardly anyone noticed we were wearing webcam glasses with electronics and a cable. It was midsummer, so wearing sunglasses was no surprise. Because it was so bright outside, it was difficult to see the green LED on the webcam module that might have attracted attention. Only one young couple smiled at us, which I attributed to us wearing webcam-enabled glasses, but I can’t even tell if that was the reason.
Even when we conducted the case study, walking along our defined route with 26 people in total (in groups of one to two participants), nobody ever got a funny look or a comment. I was there, I was the guide, and I looked out for potential conflicts with a potentially camera shy or technophobic public.
Anyway, at the end of our data collection, we annotated the images: We drew bounding box rectangles around every logo and associated a logo class with each box. Then, we re-trained Tiny YOLO, with the following results:
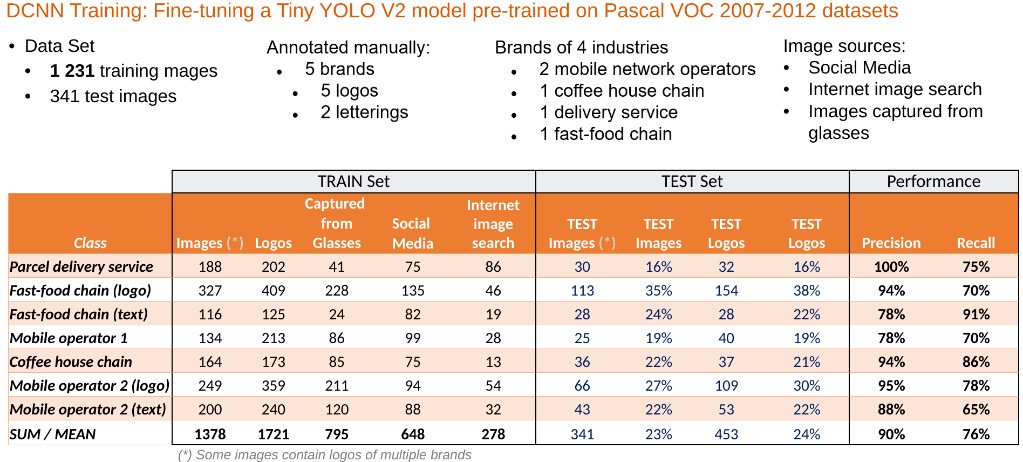
- 90% precision: the detected logo was correct in 90% of all detections
- 76% recall: the model detected 76% of all logos in the test set
We were happy with these results. However, these only showed us the performance on the test dataset. We needed to find out how the model would perform “in the wild”.
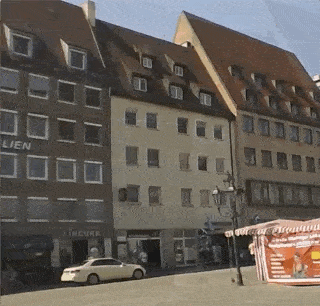
Logo Detection in the Wild
As I described above, both a working student and I went to collect additional logo images. However, we only used my images for training, giving us over one hour’s worth of her pictures snapped every second along the way to test on. After annotating the images, we ran the logo detection model on them.
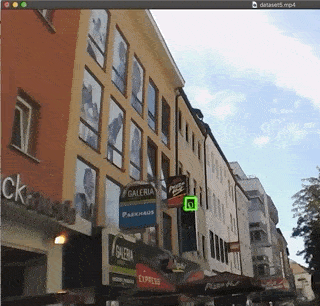
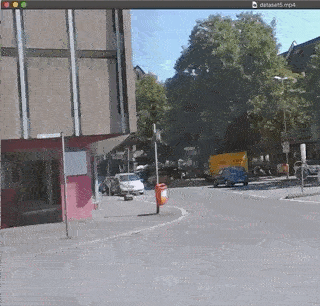
We also drew bounding rectangles around the detected logos and created a little time-lapse video of the result. While I cannot share the entire video, I can present its start and end frames - and a few snippets:
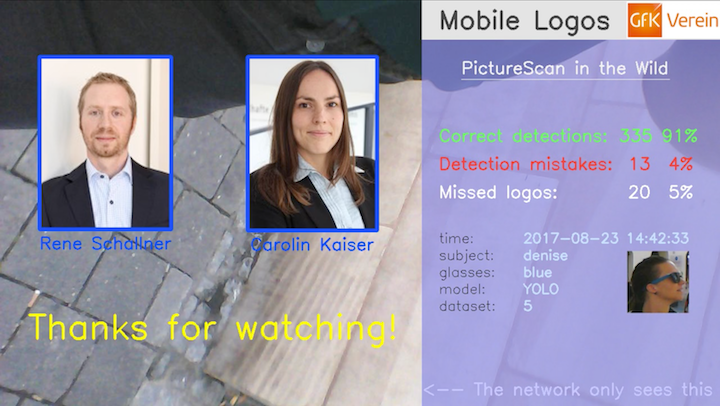
So this is how our model behaved “in the wild”:
- It detected 91% of all logos correctly
- in only 13 (4%) cases, it made a detection mistake
- it missed only 20 (5%) logos
It’s noteworthy that a missed logo is usually not so much of a problem because it is generally detected in the next second photo.
Here are some snippets from the video:
Findings of the Case Study
While the whole case study itself is outside the scope of this article about mobile logo detection, here are the key findings:
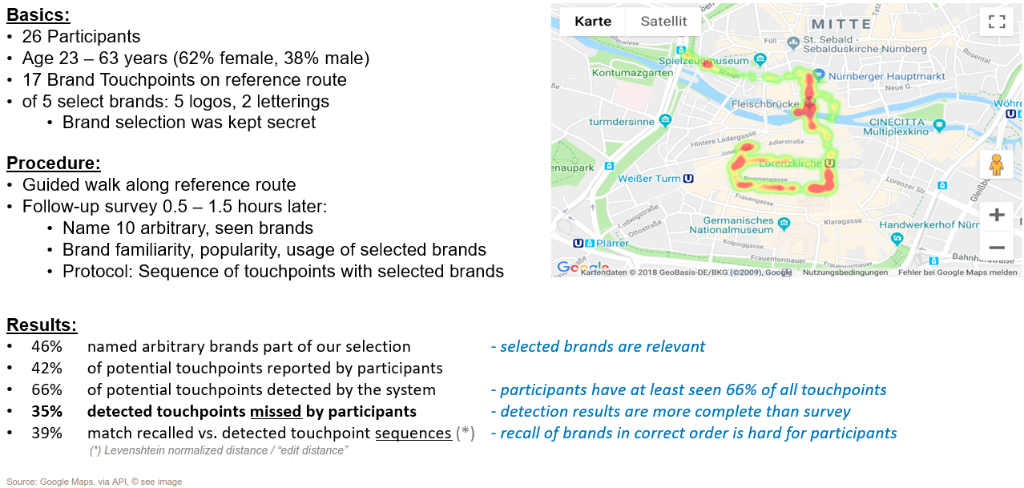
The Google Maps image above shows a heatmap of all logo detections during the study conducted with 26 participants.
The key findings were:
- the logo detection captures more brand touchpoints than probands could recall from memory: the probands did not remember 35% of the detected touchpoints.
- recalling brand touchpoints in the correct order was hard for the probands: there is only a 39% match between the detected sequence of brand touchpoints and the one given by the probands.
Wrapping Up
This project was a lot of fun, and we also learned a lot about dataset biases, BlueTooth and USB stacks, single-shot detectors for mobile, and that cables also have their advantages, to name a few. It was also a nice demonstration of synergy between deep learning & data science, software engineering for mobile devices, and, to a minor extent, electronics. The prototype we developed showed the potential of being a useful instrument for market research. However, there is lots of room for improvement. We have not explored classifying the context of the detected logos (“billboard”, “print magazine”, etc.). With 2017 technology, we were happy to achieve logo detection on a smartphone in <1s intervals, but that pretty much maxed out the Google Pixel phone’s capabilities.
Today’s (2021) much more powerful smartphone microprocessors (latest Snapdragon or Apple’s A14 Bionic chips) contain dedicated neural network acceleration circuitry on-chip. With such powerful chips, a better performing logo detection on higher resolution images with quasi-simultaneous logo context classification does not seem to be a far-fetched possibility - and I would love to explore it.
However, this field of research is not in the scope of my employer anymore, as our institute has reinvented itself. There are other exciting things to research now, for instance, how a voice assistant with an emotional voice might affect our shopping behavior.